Jour 3 · Samedi 24 octobre 2026 · 13 h – 17 hDay 3 · Saturday 24 October 2026 · 13:00 – 17:00
Recycler le PETRecycle PETet concevoir avec l’IAand design with AI
Comprendre la production de filament recyclé et expérimenter une conception assistée par IA : de la bouteille à la bande, de la bande au filament, puis du prompt à la pièce vérifiée.Understand how recycled filament is produced and try AI-assisted design: from bottle to strip, from strip to filament, then from prompt to checked part.
Kinshasa3 participantsDécoupe-bouteille · pied à coulisse · agent IABottle cutter · caliper · AI agent
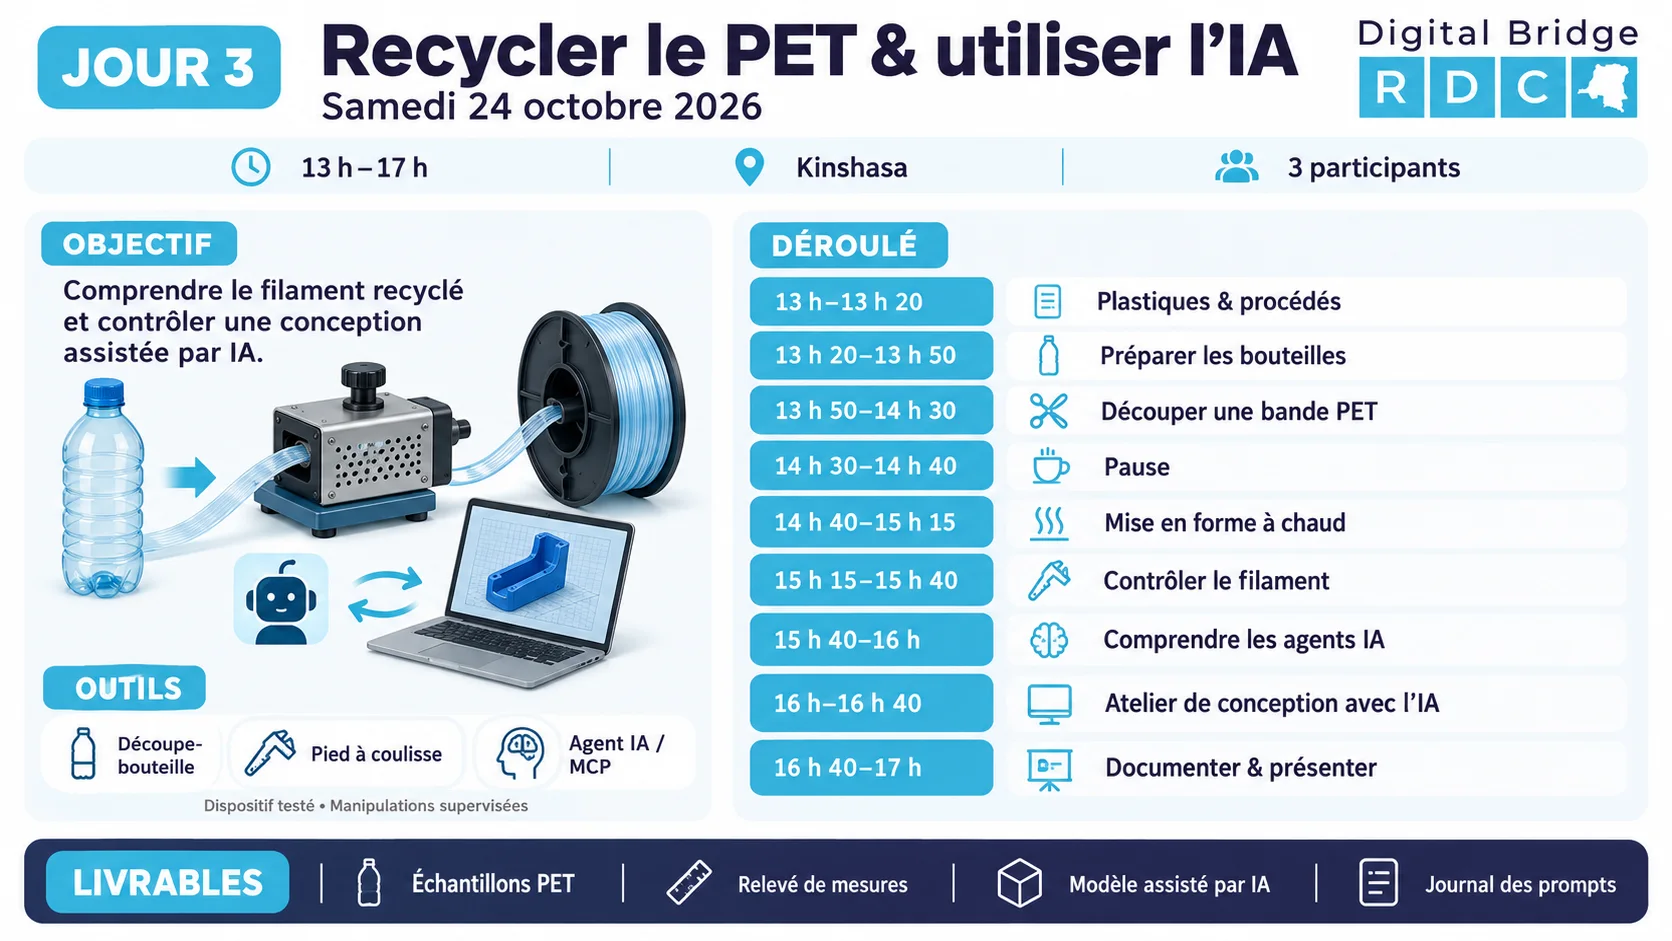
Résumé visuelVisual summary
L’infographie de la journée en un coup d’œil.The day’s infographic at a glance.
Jour 3 · Samedi 24 octobre 2026Day 3 · Saturday 24 October 2026Cliquer pour agrandirClick to enlarge
Condition de réalisation et plan BConditions for carrying out the session and plan B
Le dispositif de fabrication de filament doit être opérationnel et testé avant la séance. Le filament produit sera évalué avant son utilisation dans une imprimante.The filament-making device must be operational and tested before the session. The filament produced will be evaluated before being used in a printer.
Si le dispositif n’est pas prêt :If the device is not ready:la séance utilise des échantillons préparés à l’avance (bouteille, bande, filament) et une démonstration détaillée du procédé. Les tutoriels T2 à T5 restent valables pour l’explication et les mesures.the session uses samples prepared in advance (bottle, strip, filament) and a detailed demonstration of the process. Tutorials T2 to T5 remain valid for the explanation and the measurements.
Sécurité atelierWorkshop safety
Lames et éléments chauffants : gardez les doigts hors de la trajectoire et laissez refroidir avant toute manipulation.Blades and heating elements: keep your fingers out of the cutting path and let things cool before handling.
Espace ventilé pour le dispositif de mise en forme à chaud.Ventilated space for the hot-forming device.
Alimentation fiable et solution de secours pour les équipements ; ne débranchez pas pendant le chauffage.Reliable power and a backup solution for the equipment; do not unplug during heating.
13 h à 17 h, heure de Kinshasa.13:00 to 17:00, Kinshasa time.
13 h–13 h 2013:00–13:2020 min
Présentation du défiPresentation of the challenge
Présentation du défi : transformer une bouteille en matière utilisable. Distinguer PET, PETG et autres plastiques, ainsi que transformation par bandes et broyage/extrusion.Presentation of the challenge: turning a bottle into usable material. Distinguish PET, PETG and other plastics, as well as strip processing and grinding/extrusion.
Résultat : Compréhension des matières et des procédés.Result: Understanding of the materials and processes.Voir le tutorielSee the tutorial
13 h 20–13 h 5013:20–13:5030 min
Préparation des bouteillesBottle preparation
Préparation des bouteilles : identification, retrait des étiquettes, nettoyage, séchage et sélection des parties adaptées. Précautions concernant les lames et les éléments chauffants.Bottle preparation: identification, label removal, cleaning, drying and selection of suitable parts. Precautions concerning blades and heating elements.
Démonstration du découpe-bouteille : maintien, amorçage, découpe et régularité de la bande. Observation de l’influence de l’épaisseur de la bouteille.Bottle cutter demonstration: holding, starting, cutting and regularity of the strip. Observation of the influence of the bottle thickness.
Démonstration de mise en forme à chaud : cheminement, traction, refroidissement et enroulement. Mesure du diamètre à plusieurs endroits.Hot-forming demonstration: path, pulling, cooling and winding. Measuring the diameter at several places.
Résultat : Échantillon de filament et relevé de mesures.Result: Filament sample and measurement record.Voir le tutorielSee the tutorial
15 h 15–15 h 4015:15–15:4025 min
Évaluation du filamentFilament evaluation
Évaluation du filament : régularité, ovalisation, propreté et comportement à la flexion. Vérifications nécessaires avant un essai d’impression.Filament evaluation: regularity, ovality, cleanliness and bending behaviour. Checks needed before a print test.
Découverte de l’agent IA : objectif, outils, étapes, vérification et correction. Différence entre une réponse textuelle et une action réalisée dans un logiciel.Discovering the AI agent: objective, tools, steps, checking and correction. Difference between a text answer and an action carried out in software.
Atelier IA : fournir un croquis et des dimensions, demander une proposition, vérifier le résultat et réaliser une modification. Utilisation d’une connexion à un outil, d’un script Blender ou d’instructions de CAO selon les moyens disponibles.AI workshop: provide a sketch and dimensions, ask for a proposal, check the result and carry out a modification. Use of a connection to a tool, a Blender script or CAD instructions depending on the means available.
Résultat : Modification assistée par IA et contrôlée.Result: AI-assisted and checked modification.Voir le tutorielSee the tutorial
16 h 40–17 h16:40–17:0020 min
Documentation et présentationDocumentation and presentation
Documentation du prompt, des erreurs détectées et des corrections humaines. Présentation du résultat.Documenting the prompt, the errors detected and the human corrections. Presentation of the result.
Huit tutoriels : cinq pour le recyclage du PET, trois pour la conception assistée par IA.Eight tutorials: five for PET recycling, three for AI-assisted design.
PET, PETG et autres plastiques : comprendre la matièrePET, PETG and other plastics: understanding the material
Savoir quelles bouteilles se prêtent au recyclage en filament, pourquoi le PET se travaille autrement que le PETG, et choisir entre les deux voies de transformation.Know which bottles are suitable for recycling into filament, why PET is worked differently from PETG, and choose between the two transformation routes.
Bande (découpe en spirale)Strip (spiral cutting)
Broyage et extrusionGrinding and extrusion
PrincipePrinciple
On découpe la bouteille en une longue bande, puis on l’étire et la forme à chaud en filament.The bottle is cut into a long strip, which is then stretched and hot-formed into filament.
On broie la bouteille en paillettes, on les sèche, on les fait fondre et on les extrude en filament.The bottle is ground into flakes, dried, melted and extruded into filament.
MatérielEquipment
Découpe-bouteille, dispositif de chauffe et de tractionBottle cutter, heating and pulling device
Dépend de l’épaisseur de la bouteille et de la découpeDepends on the bottle thickness and on the cutting
Meilleur contrôle possible, mais machine plus complexeBest possible control, but a more complex machine
Intérêt pour la formationValue for the training
Visible à l’œil, bon pour comprendre chaque étapeVisible to the eye, good for understanding each step
Plus proche d’une production régulièreCloser to regular production
Usage du filament recycléUse of recycled filamentLe filament issu de bouteilles n’est pas certifié pour un contact alimentaire. Utilisez-le pour des pièces d’atelier, de prototype ou de support.Filament made from bottles is not certified for food contact. Use it for workshop, prototype or support parts.
0/5étapessteps
J3 · T2D3 · T230 min · 13 h 2030 min · 13:20
Préparer les bouteillesPrepare the bottles
Transformer des bouteilles usagées en matière première propre, sèche et triée.Turn used bottles into clean, dry, sorted raw material.
0/7étapessteps
Lames et éléments chauffantsBlades and heating elementsCutter et découpe-bouteille : la lame est coupante même à l’arrêt. Gardez les mains hors de la trajectoire de coupe. Le dispositif chauffé reste brûlant après l’arrêt : laissez-le refroidir avant de le toucher.Cutter and bottle cutter: the blade is sharp even when stopped. Keep your hands out of the cutting path. The heated device stays hot after it is switched off: let it cool before touching it.
J3 · T3D3 · T340 min · 13 h 5040 min · 13:50
Découpe-bouteille : fabriquer une bande régulièreBottle cutter: making a regular strip
Obtenir une bande de largeur et d’épaisseur constantes, base d’un filament régulier.Obtain a strip of constant width and thickness, the basis of a regular filament.
0/8étapessteps
Largeur de bande pour une section viséeStrip width for a target cross-section
Section du filamentFilament cross-section–
Largeur de bande indicativeIndicative strip width–
Hypothèse : la section de la bande (largeur × épaisseur) égale celle du filament. C’est un ordre de grandeur : l’étirage à chaud change la section réelle ; ajustez après un essai.Assumption: the cross-section of the strip (width × thickness) equals that of the filament. This is an order of magnitude: hot stretching changes the real cross-section; adjust after a trial.
J3 · T4D3 · T435 min · 14 h 4035 min · 14:40
Mise en forme à chaud : de la bande au filamentHot forming: from strip to filament
Observer et mesurer la transformation d’une bande en filament sur le dispositif de traction et de chauffe, sans changer plus d’un paramètre à la fois.Observe and measure the transformation of a strip into filament on the pulling and heating device, without changing more than one parameter at a time.
0/8étapessteps
Position (cm)
Diamètre 1 (mm)Diameter 1 (mm)
Diamètre 2 (mm)Diameter 2 (mm)
RemarqueNote
10
20
30
40
50
Si le filament n’est pas régulier : pistes d’ajustementIf the filament is not regular: adjustment leads
Ces tendances aident à chercher dans le bon sens ; la valeur exacte se trouve par essais, un paramètre à la fois.These tendencies help you look in the right direction; the exact value is found by trials, one parameter at a time.
Trop fin :Too thin:la traction est trop rapide ou la chauffe trop forte pour la largeur de bande utilisée.the pulling is too fast or the heating too strong for the strip width used.
Trop épais :Too thick:la bande est trop large ou la traction trop lente.the strip is too wide or the pulling too slow.
Diamètre qui varie :Varying diameter:épaisseur de bouteille irrégulière, tension d’enroulement variable ou température instable.irregular bottle thickness, variable winding tension or unstable temperature.
Bulles ou aspect laiteux :Bubbles or milky look:humidité dans la bande ou chauffe trop forte.moisture in the strip or heating too strong.
Bande qui casse :Strip that breaks:pli ou défaut de la bouteille, ou température trop basse.fold or defect in the bottle, or temperature too low.
J3 · T5D3 · T525 min · 15 h 1525 min · 15:15
Évaluer le filament recycléEvaluate the recycled filament
Décider, chiffres à l’appui, si le filament produit peut être essayé dans une imprimante, et ce qu’il faut corriger sinon.Decide, with figures to support it, whether the filament produced can be tried in a printer, and what to correct if not.
Contrôler un filament à partir de vos mesuresCheck a filament from your measurements
MesuresMeasurements–
MoyenneAverage–
Minimum–
Maximum–
Écart max - minMax - min difference–
Écart-typeStandard deviation–
Vérifier la section par la peséeCheck the cross-section by weighing
Section déduiteDeduced cross-section–
Diamètre équivalentEquivalent diameter–
Un mètre de PET de 1,75 mm de diamètre pèse environ 3,3 g. Un filament nettement plus léger est trop fin, ou contient des bulles.One metre of 1.75 mm diameter PET weighs about 3.3 g. A filament that is clearly lighter is too thin, or contains bubbles.
0/8étapessteps
ContrôleCheck
Critère de départStarting criterion
Décision si non conformeDecision if not compliant
Diamètre moyenAverage diameter
1,75 mm ± 0,05 mm1.75 mm ± 0.05 mm
No-go : refaire avec les réglages ajustésNo-go: redo with adjusted settings
Différence inférieure à 0,05 mmDifference of less than 0.05 mm
No-go ou essai sur petite pièceNo-go or test on a small part
PropretéCleanliness
Pas de bulle ni de zone laiteuseNo bubbles or milky areas
No-go : séchage ou température à revoirNo-go: review drying or temperature
FlexionBending
Plie autour du doigt sans casserBends around the finger without breaking
No-go : filament trop fragileNo-go: filament too brittle
Masse d’un mètreMass of one metre
Environ 3,3 gAbout 3.3 g
Revoir la section du filamentReview the filament cross-section
Premier essai d’impressionFirst print test
Séchez le filament.Dry the filament.
Imprimez une petite pièce simple : cube de 20 mm avec une seule paroi, ou petite équerre.Print a small simple part: a 20 mm cube with a single wall, or a small bracket.
Prenez comme point de départ un profil de PETG, avec une vitesse réduite et une température proche de ce profil, puis ajustez d’un réglage à la fois.Take a PETG profile as a starting point, with a reduced speed and a temperature close to that profile, then adjust one setting at a time.
Observez la première couche, le diamètre mesuré en cours d’impression et les obstructions de la buse.Watch the first layer, the diameter measured during printing and nozzle blockages.
J3 · T6D3 · T620 min · 15 h 4020 min · 15:40
Qu’est-ce qu’un agent IA ?What is an AI agent?
Comprendre la différence entre une réponse textuelle et une action réalisée dans un logiciel, et pourquoi la vérification reste humaine.Understand the difference between a text answer and an action carried out in software, and why checking remains human.
4 ActionL’objet est créé ou modifié dans le logiciel.The object is created or modified in the software.
5 Vérification5 CheckingMesures, aperçu, tranchage : par un humain.Measurements, preview, slicing: by a human.
6 CorrectionOn corrige la consigne ou le modèle et on recommence.You correct the instruction or the model and start again.
À retenirRememberUn agent est rapide, pas infaillible. Il peut inventer une dimension, mélanger des unités ou proposer une forme impossible à imprimer. Votre rôle est de mesurer.An agent is fast, not infallible. It can invent a dimension, mix up units or propose a shape that cannot be printed. Your role is to measure.
0/5étapessteps
J3 · T7D3 · T740 min · 16 h40 min · 16:00
Atelier IA : concevoir un support de capteur avec un agentAI workshop: designing a sensor mount with an agent
Fournir un croquis et des dimensions, obtenir une proposition, la vérifier et réaliser une modification contrôlée.Provide a sketch and dimensions, get a proposal, check it and carry out a controlled modification.
Méthode en six tempsSix-step method
Décrire le besoin et fournir les dimensions.Describe the need and provide the dimensions.
Préciser le matériau et les contraintes de fabrication.Specify the material and the manufacturing constraints.
Demander une proposition et ses hypothèses.Ask for a proposal and its assumptions.
Contrôler la géométrie et les dimensions.Check the geometry and the dimensions.
Tester, puis corriger le résultat.Test, then correct the result.
Conserver le prompt, le fichier et les observations.Keep the prompt, the file and the observations.
Exemple de consigne du programmeExample instruction from the programme
Aide-moi à concevoir un support de capteur. Voici ses dimensions et ses points de fixation. Propose une géométrie simple, précise les informations manquantes et explique comment vérifier les dimensions avant l’impression.Help me design a sensor mount. Here are its dimensions and its fixing points. Propose a simple geometry, state the missing information and explain how to check the dimensions before printing.
Modèle de prompt détaillé à copierDetailed prompt template to copy
Aide-moi à concevoir un support de capteur pour impression 3D en PLA.

Objet : [nom du capteur ou du composant]
Dimensions mesurées (mm) : longueur [..], largeur [..], épaisseur [..]
Fixations : [2 trous Ø.. mm, entraxe .. mm] ou [pas de trou]
Fixation sur : [tube, plaque, châssis de drone ...] avec vis M[..]
Contraintes : épaisseur de paroi d'au moins 1,6 mm, pas de surplomb au-delà de 45 degrés, pièce imprimable à plat sans support.
Logiciel : Blender 4.x (script Python), unité Blender = 1 mm.

Avant de proposer quoi que ce soit : liste les informations manquantes et les hypothèses que tu fais.
Puis propose une géométrie simple, donne les dimensions finales dans un tableau et explique comment je les vérifie avant l'impression.Help me design a sensor mount for 3D printing in PLA.

Object: [name of the sensor or component]
Measured dimensions (mm): length [..], width [..], thickness [..]
Fixings: [2 holes Ø.. mm, hole spacing .. mm] or [no hole]
Mounted on: [tube, plate, drone frame ...] with M[..] screws
Constraints: wall thickness of at least 1.6 mm, no overhang beyond 45 degrees, part printable flat without support.
Software: Blender 4.x (Python script), Blender unit = 1 mm.

Before proposing anything: list the missing information and the assumptions you are making.
Then propose a simple geometry, give the final dimensions in a table and explain how I check them before printing.
0/9étapessteps
Exemples de prompts de correctionExamples of correction prompts
Le trou de gauche mesure 3,8 mm au lieu de 4,2 mm. Corrige le script et explique l'erreur.
Les deux trous ne sont pas centrés sur la largeur W. Donne le calcul de leur position.
Ajoute un congé de 2 mm sur les arêtes extérieures sans changer les cotes de montage.
Réécris le script pour que toutes les dimensions soient des variables en tête de fichier.The left hole measures 3.8 mm instead of 4.2 mm. Fix the script and explain the error.
The two holes are not centred on the width W. Give the calculation of their position.
Add a 2 mm fillet on the outer edges without changing the mounting dimensions.
Rewrite the script so that all the dimensions are variables at the top of the file.
Script Blender de référence : équerre en L (Python)Reference Blender script: L-shaped bracket (Python)
import bpy

# Convention : 1 unité Blender = 1 mm. Équerre en L paramétrique, avec deux trous.
L, W, T = 40.0, 20.0, 4.0     # longueur de chaque aile, largeur, épaisseur
D = 4.2                        # diamètre des trous (vis M4 avec jeu)
POS = 0.7 * L                  # position des trous depuis l'angle

sc = bpy.context.scene
sc.unit_settings.system = 'METRIC'
sc.unit_settings.scale_length = 0.001
sc.unit_settings.length_unit = 'MILLIMETERS'

def box(name, sx, sy, sz, loc):
    bpy.ops.mesh.primitive_cube_add(size=1, location=loc)
    o = bpy.context.active_object
    o.name = name
    o.scale = (sx, sy, sz)
    bpy.ops.object.transform_apply(scale=True)
    return o

def cylinder(name, d, depth, loc, rot=(0, 0, 0)):
    bpy.ops.mesh.primitive_cylinder_add(radius=d / 2, depth=depth, location=loc, rotation=rot)
    o = bpy.context.active_object
    o.name = name
    return o

def boolean(target, tool, op):
    m = target.modifiers.new(name="bool", type='BOOLEAN')
    m.operation = op            # 'UNION' ou 'DIFFERENCE'
    m.object = tool
    m.solver = 'EXACT'
    bpy.context.view_layer.objects.active = target
    bpy.ops.object.modifier_apply(modifier=m.name)
    bpy.data.objects.remove(tool, do_unlink=True)

base = box("Equerre", L, W, T, (L / 2, W / 2, T / 2))
wall = box("Paroi", T, W, L, (T / 2, W / 2, L / 2))
boolean(base, wall, 'UNION')

hole_base = cylinder("TrouBase", D, T * 3, (POS, W / 2, T / 2))
boolean(base, hole_base, 'DIFFERENCE')

hole_wall = cylinder("TrouParoi", D, T * 3, (T / 2, W / 2, POS), rot=(0, 1.5708, 0))
boolean(base, hole_wall, 'DIFFERENCE')

print("Dimensions (mm) :", tuple(round(v, 2) for v in base.dimensions))import bpy

# Convention: 1 Blender unit = 1 mm. Parametric L-shaped bracket, with two holes.
L, W, T = 40.0, 20.0, 4.0     # length of each wing, width, thickness
D = 4.2                        # hole diameter (M4 screw with clearance)
POS = 0.7 * L                  # hole position from the corner

sc = bpy.context.scene
sc.unit_settings.system = 'METRIC'
sc.unit_settings.scale_length = 0.001
sc.unit_settings.length_unit = 'MILLIMETERS'

def box(name, sx, sy, sz, loc):
    bpy.ops.mesh.primitive_cube_add(size=1, location=loc)
    o = bpy.context.active_object
    o.name = name
    o.scale = (sx, sy, sz)
    bpy.ops.object.transform_apply(scale=True)
    return o

def cylinder(name, d, depth, loc, rot=(0, 0, 0)):
    bpy.ops.mesh.primitive_cylinder_add(radius=d / 2, depth=depth, location=loc, rotation=rot)
    o = bpy.context.active_object
    o.name = name
    return o

def boolean(target, tool, op):
    m = target.modifiers.new(name="bool", type='BOOLEAN')
    m.operation = op            # 'UNION' or 'DIFFERENCE'
    m.object = tool
    m.solver = 'EXACT'
    bpy.context.view_layer.objects.active = target
    bpy.ops.object.modifier_apply(modifier=m.name)
    bpy.data.objects.remove(tool, do_unlink=True)

base = box("Equerre", L, W, T, (L / 2, W / 2, T / 2))
wall = box("Paroi", T, W, L, (T / 2, W / 2, L / 2))
boolean(base, wall, 'UNION')

hole_base = cylinder("TrouBase", D, T * 3, (POS, W / 2, T / 2))
boolean(base, hole_base, 'DIFFERENCE')

hole_wall = cylinder("TrouParoi", D, T * 3, (T / 2, W / 2, POS), rot=(0, 1.5708, 0))
boolean(base, hole_wall, 'DIFFERENCE')

print("Dimensions (mm):", tuple(round(v, 2) for v in base.dimensions))
Version de BlenderBlender versionLe script a été écrit pour Blender 4.x. Si une commande est refusée, copiez le message d’erreur dans votre prochain prompt : c’est un très bon exercice de correction. L’export STL se fait par le menuThe script was written for Blender 4.x. If a command is refused, copy the error message into your next prompt: it is a very good correction exercise. The STL export is done through the menuFile, Export, STL.
Journal des prompts et des vérificationsLog of prompts and checks
N°No.
Prompt (résumé)Prompt (summary)
Résultat de l’IAAI result
Erreur détectée par l’humainError detected by the human
Correction
1
2
3
J3 · T8D3 · T820 min · 16 h 4020 min · 16:40
Documenter et présenter l’expérienceDocument and present the experiment
Transformer un essai en connaissance réutilisable : fiche reproductible et présentation courte.Turn a trial into reusable knowledge: reproducible sheet and short presentation.
0/6étapessteps
Fiche d’expérience IAAI experiment sheet
Date : 24/10/2026         Participant :
Besoin :
Outil et version :
Prompt initial :
Hypothèses annoncées par l'IA :
Résultat obtenu (fichier, image) :
Mesures de contrôle :
Erreur détectée :
Correction apportée :
Ce que je referais différemment :Date: 24/10/2026         Participant:
Need:
Tool and version:
Initial prompt:
Assumptions stated by the AI:
Result obtained (file, image):
Control measurements:
Error detected:
Correction made:
What I would do differently:
LivrablesDeliverables
Livrables de la journéeDeliverables of the day
Pour la dernière séanceFor the last session
Apportez le fichier du modèle assisté par IA et la pièce imprimée, si elle est prête : elle sera la vedette de la scène Blender du jour 4.Bring the file of the AI-assisted model and the printed part, if it is ready: it will be the star of the day 4 Blender scene.